Home staging before video: a step-by-step guide
Learn how to stage a property before filming a listing video. A room-by-room walkthrough of a fictional 120 m² apartment, with before and after examples.
Published 7 min read

Home staging before video is the hour that decides whether your listing video looks like a home buyers want or a home someone is still living in. A camera moving through a room sees more than a photo: the open closet behind the door, the cables under the TV, the dark hallway between rooms. This guide gives you a six-step process and walks through a fictional 120 m² apartment room by room, with the before and after of each space and the time each step takes.
Why home staging before video matters more than for photos
Staging already pays off for photos. In the National Association of Realtors’ 2025 Profile of Home Staging, 83% of buyers’ agents said staging made it easier for buyers to picture the property as their future home, and 49% of sellers’ agents said it reduced time on market. Buyers’ agents rated videos as highly important to their clients 48% of the time, behind photos (73%) and physical staging (57%) (NAR, 2025).
Video raises the bar in three ways:
- There is no edge of the frame. A photographer points the lens away from the laundry basket. A walkthrough turns toward it.
- Transitions are on screen. Doorways, hallways and the first step into each room become part of the tour.
- Light changes as you move. A room that looks bright in one photo can drop into shadow when the camera turns its back to the window.
So staging for video means staging the path, not just the rooms.
Meet the example: a fictional 120 m² apartment
To keep this concrete, we will stage one apartment from start to finish. It is fictional, but the layout is common:
- 120 m² (about 1,290 sq ft) on the 8th floor of a fictional building at 1824 Palm Crest Drive
- Open living and dining room with a balcony door
- Kitchen with an island
- Three bedrooms: a primary suite, a guest room and a home office
- Two bathrooms: the primary en suite and a shared one
- A 9-meter hallway connecting everything
The owners still live there, with two kids. That is the usual case for listing videos, and the hardest one to stage.
Step 1-3: declutter, deep clean and depersonalize every room
These three steps take most of the time, so do them the day before filming if you can.
Step 1: Declutter (about 90 minutes)
Work with three boxes per room: keep visible, hide and leave the room. As a rule, leave no more than three objects on any surface. In our apartment that meant:
- Clearing the kitchen counters down to a fruit bowl and a cutting board
- Taking the shoes, backpacks and coats out of the hallway
- Emptying the top of the dresser in the primary bedroom
- Moving the kids’ toys into the home office closet, which we will not film open
Step 2: Deep clean what the camera will catch (about 60 minutes)
Video catches reflections and streaks that photos soften. Focus on:
- Windows and the balcony glass, inside and out
- Mirrors, the oven door, the stovetop and stainless steel
- Light switches and door handles, which appear at the edge of every doorway shot
- Floors in the hallway, since the camera spends the most time looking at them
Step 3: Depersonalize (about 20 minutes)
Take down family photos, kids’ drawings, religious items, diplomas and anything with a name on it. Buyers should picture their life in the space, and you avoid putting the owners’ private life on Instagram.
Step 4-6: furniture layout, lighting and color for the camera
Step 4: Open the walking path (about 30 minutes)
Walk the route you will film with the phone at chest height. Anything that blocks the frame or forces you to step around it gets moved. In our apartment, the dining chairs went fully under the table, the armchair moved 40 cm toward the wall, and the coffee table rotated so the path from the hallway to the balcony is straight.
Step 5: Light every room the same way (about 15 minutes)
- Open every curtain and blind fully.
- Turn on every light, including lamps and under-cabinet lights, even in daylight.
- Use bulbs of the same color temperature in each room, so the video does not jump from warm to cold as you walk.
- Film between mid-morning and mid-afternoon to keep the window light steady.
Step 6: Add color in small, repeatable touches (about 15 minutes)
Pick one accent color and repeat it in two or three places per room: a throw, two cushions, a vase. On a small phone screen, repeated color makes the tour feel planned instead of random. Fresh towels and a green plant cover the bathrooms and the kitchen.
Room-by-room before and after: living room, kitchen, bedrooms and bathrooms
Living room and dining
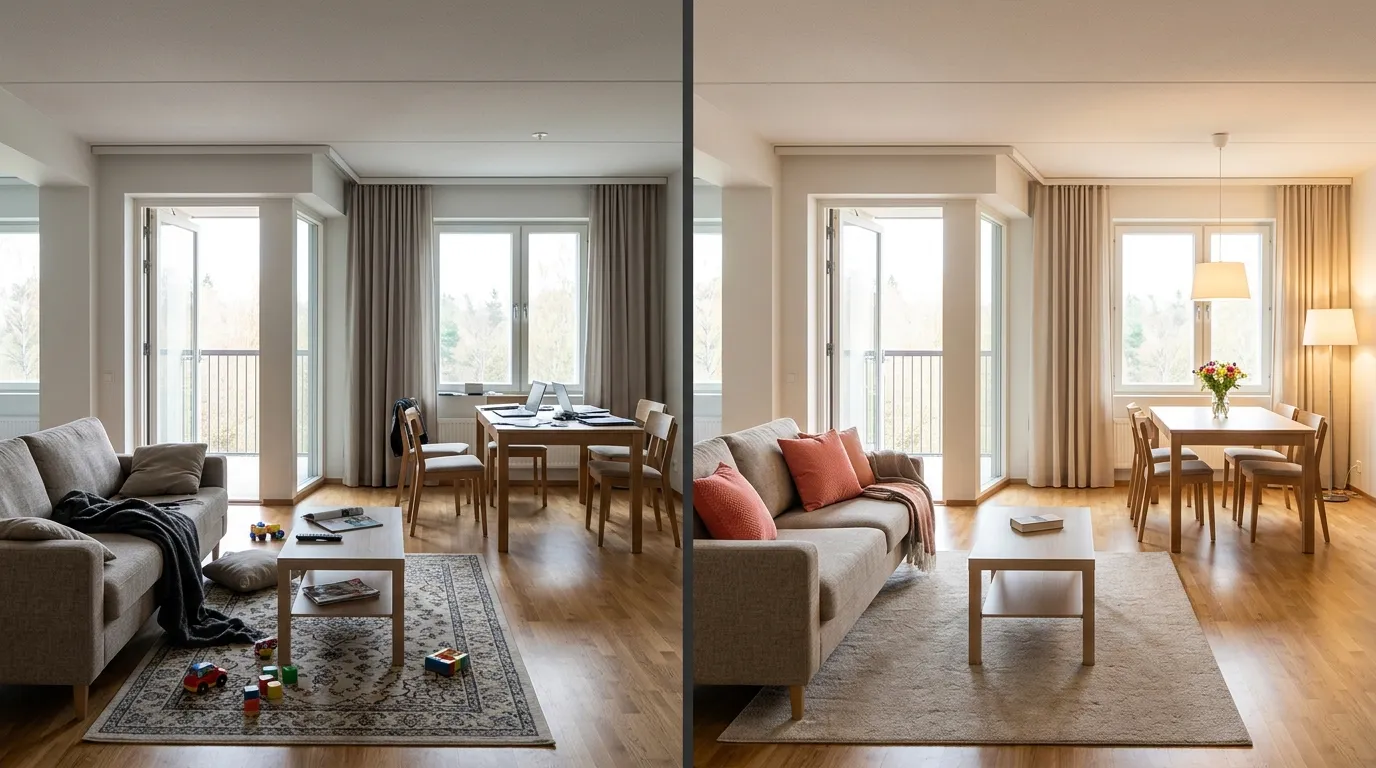
- Before: a blanket on the sofa, a few toys on the rug, laptops and papers on the dining table, curtains half closed.
- After: two cushions and one folded throw, a clear table with one vase of flowers, curtains open to the balcony, every lamp on.
Start the video at the hallway entrance and walk straight toward the balcony door. It is the clip that sells the apartment’s light.
Kitchen
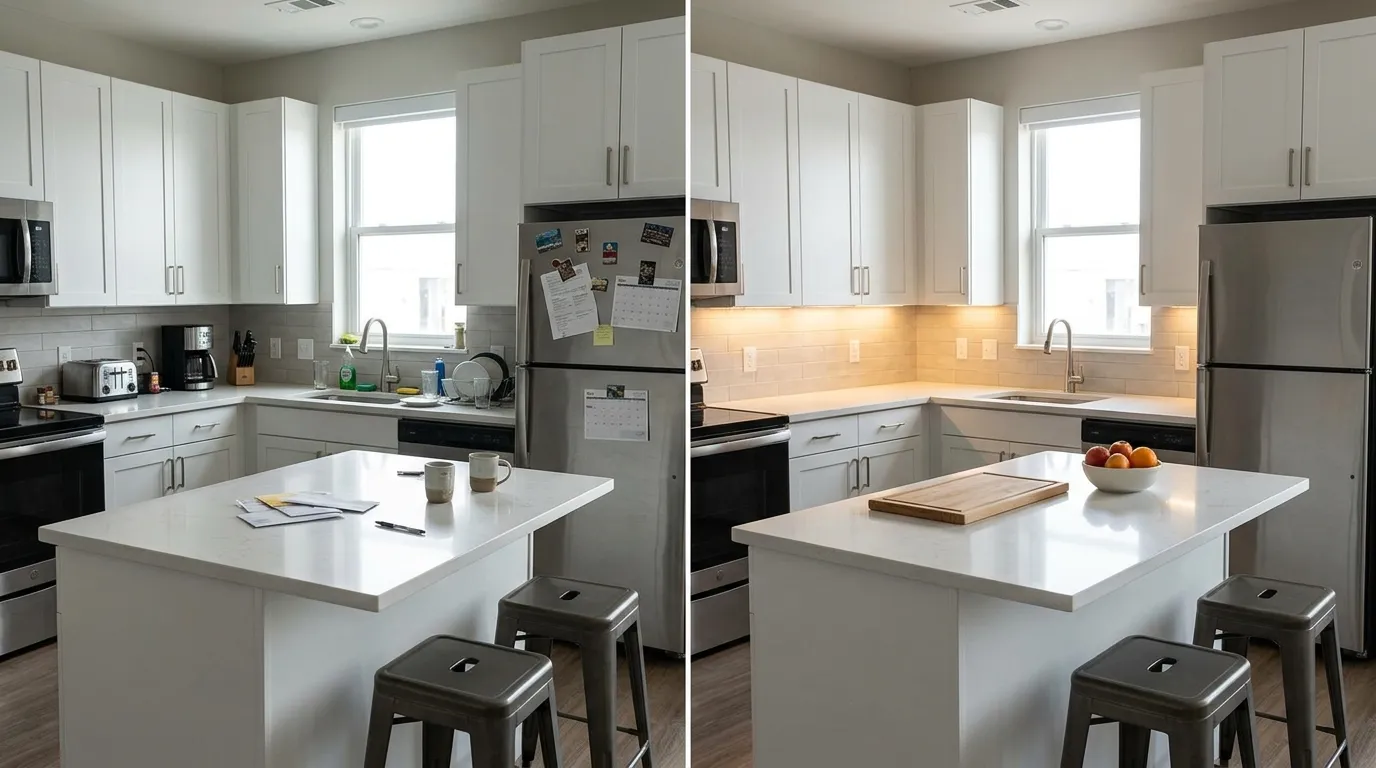
- Before: dishes by the sink, a toaster and coffee machine on the counter, mail and mugs on the island, notes on the fridge.
- After: empty sink, one fruit bowl and one cutting board, appliances stored, fridge door cleared, under-cabinet lights on.
Primary bedroom and the two other bedrooms
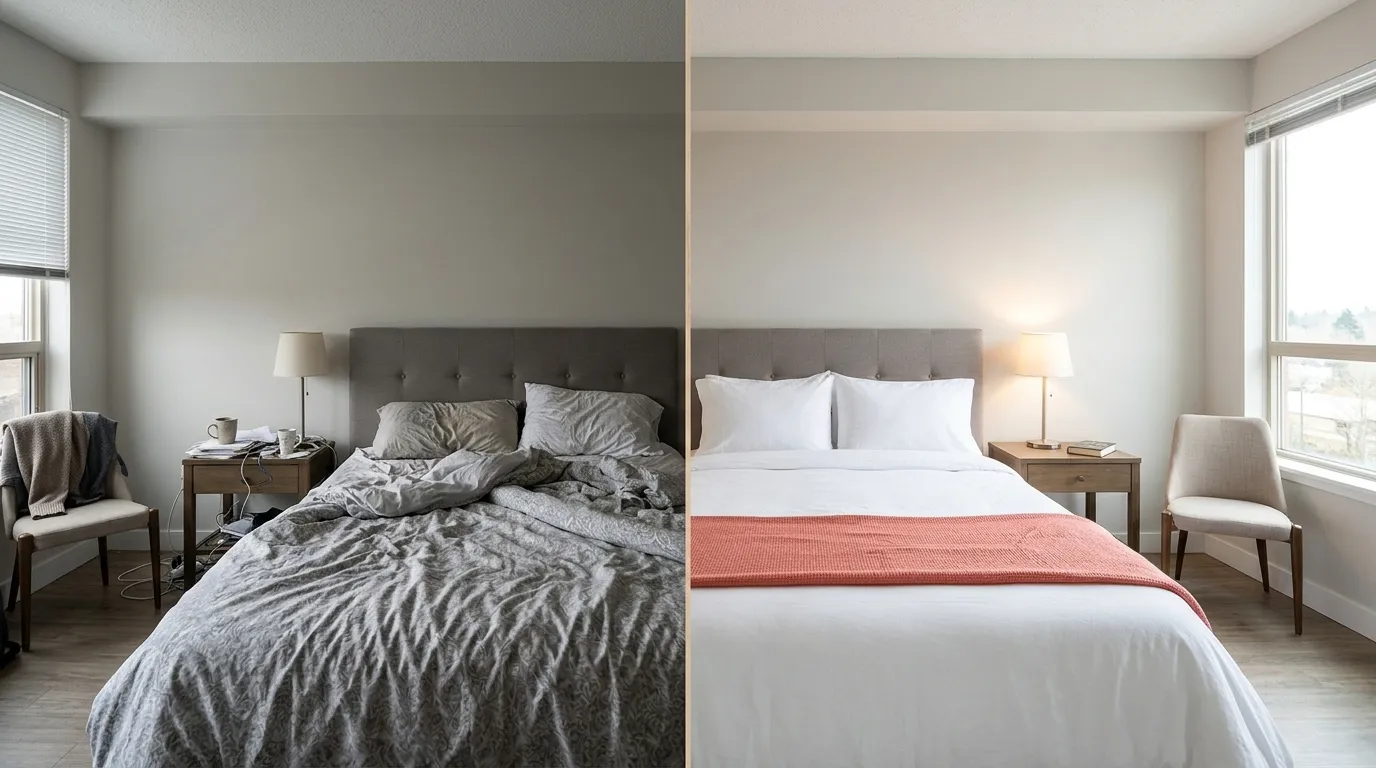
- Primary bedroom, before: rumpled duvet, a sweater on the chair, mugs and cables on the nightstand.
- Primary bedroom, after: white bedding with the accent-color throw, both lamps on, one object per nightstand, blinds up.
- Guest room and office: these rank lower with buyers, so give each a clear purpose (a made bed, a clean desk) and film them in one short clip each.
Bathrooms
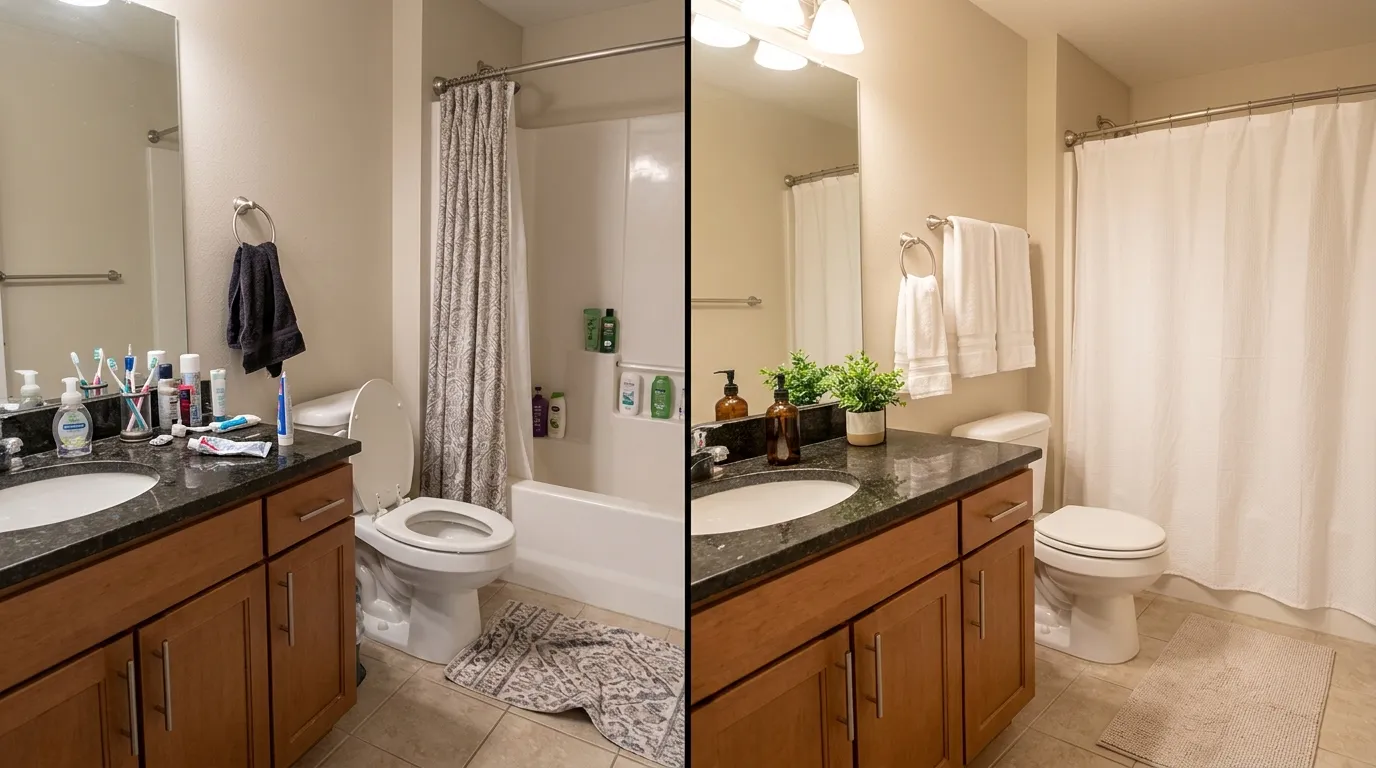
- Before: toothbrushes and toiletries on the counter, a hand towel hanging crooked, lid up, a crumpled bath mat.
- After: two soap bottles and two small plants, matching white towels, lid down, the bath mat straightened.
Final pre-shoot checklist with timings for a 120 m² apartment
| Task | Time |
|---|---|
| Declutter all rooms | 90 min |
| Deep clean glass, mirrors, metal and floors | 60 min |
| Depersonalize | 20 min |
| Open the walking path | 30 min |
| Lights and curtains | 15 min |
| Accent color, towels and plants | 15 min |
| Total staging | about 3 h 50 min |
| Filming 9 to 10 clips | about 45 to 60 min |
Right before you press record:
- Every light on, every curtain open.
- Toilet lids down, faucets dry, beds smooth.
- Pets and people out of the rooms you are filming.
- Phone on vertical, lens clean. Instagram accepts Reels between 1.91:1 and 9:16, at 30 frames per second or more and at least 720 pixels (Instagram Help Center); filming in 9:16 at 1080p fills the whole screen.
From staged rooms to a listing video with Haus
Once the apartment is staged, the filming itself should take less time than the cleaning. Haus is a listing video app built for this part:
- Film one clip per room. Before each room, a short clip in the app shows you where to stand and how to move, so you walk the path you just cleared.
- Add photos where you have no clip. The balcony view or an aerial shot can come from your photo library. Each photo stays on screen for 1 to 10 seconds (3 by default) and can zoom or pan.
- Keep the hallway short. The speed ramp, from 0.5x to 2.5x (or 5x), turns the 9-meter walk between rooms into a couple of seconds without cutting it out.
- Put the numbers on screen. Pick a listing template and enter the price, bedrooms, bathrooms and area once: 120 m², three bedrooms, two bathrooms.
- Export with your brand. Your logo stays on every frame and the video ends on your name and number, in portrait for Reels and TikTok, square for the feed or landscape for YouTube.
Stage it in one afternoon, film it in under an hour, and let the app do the editing. Download Haus and try it on your next listing.
Frequently asked questions
How long does home staging before video take?
For a 120 m² apartment that is already furnished, plan on about 4 hours of staging and 1 hour of filming. Decluttering and cleaning take most of the time; arranging furniture and light takes about an hour.
Is staging for video different from staging for photos?
Yes. A photo hides everything outside the frame, while a video walks through it. The hallway, the doorframes and the view as you turn a corner all show up on camera, so they need the same care as the rooms.
Do I need to hire a professional stager?
Not always. NAR's 2025 Profile of Home Staging puts the median cost of a professional staging service at $1,500, against $500 when the agent stages the home. For an occupied, furnished apartment, the steps in this guide cover most of what a stager would do.
Which rooms matter most?
The living room, the primary bedroom and the kitchen. Buyers' agents in NAR's 2025 survey ranked them as the most important rooms to stage, in that order.


